
Get the best out of your OSMO Pocket
by Vadim Sherbakov / @madebyvadim

Let’s face it we all like this little machine. It is small and compact, its shoot 4k, it has a handful of cool features, but not everyone is convinced it can produce great results.
So how do we squeeze the best out of it?
Let me tell you a few things that will help you to get the best out of your Osmo Pocket.

Accessories
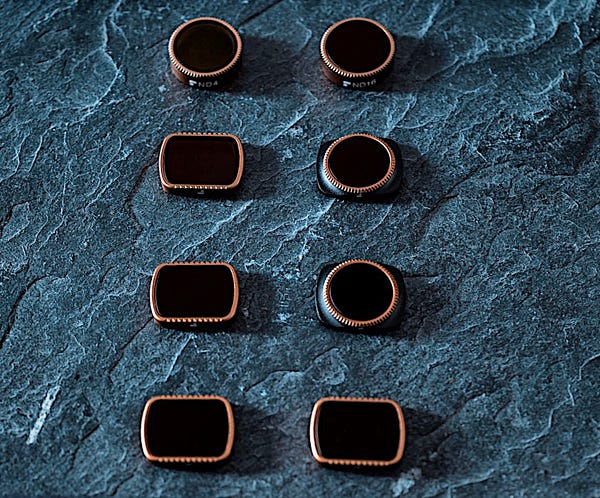
There are tons of great accessories available for OP out there, but perhaps the most important is ND filters. So why is that? Ok we all strive for better video/films, we want it to be more cinematic and movie-like instead of just a video, and what’s better than a good ol’ motion blur? That’s will make your footage looks more professional and pleasing to viewers. And how to achieve that if you shoot at a bright light? Right … Exactly … ND filters. And since they are so easy to take on and of due to the magic of magnetism, there is no brainer. Get yourself a few ND (from ND 4 — ND 32) and you will be good to go. I use Polar Pro set.
Another great addition is cases with a thread so you can put OP on a tripod (Great for timelapses or motionlapses)
A small tripod is also a cool addition. You can have even more stable motionlapse or even pan/tilt videos.
Another one of my favorites is a Wifi module. First, it works as a more stable stand on its own. Second, you can put OP to some places where you can not see the screen properly nor can attach the phone, but you can use it with wifi.
Also if you shoot with someone you can use it as a director’s monitor.
A great addition to the collection of accessories will be a monopod preferably with an extended pole. You can use it in various creatives ways including this https://youtu.be/bokmCktxqM0
Handling

Because OP is a lightweight device (which is great) it has a downfall. It shakes easier than heavier stabilizer systems. So be very careful and walk smoother and try not to make amplitude movements (up/down) as they are almost impossible to get rid of on the post-production stage. Take your time and make a few runs.
You can buy an accessory such as this to help a little bit with handles but still all depends on your ability to walk like a ninja.
Creative movements

After you succeed with traditional types of movements its time to try something new. Roll, fly through or boom imitation is just a few techniques to try out. Check this great video to start your creative juice flowing.
A tip from me. You can use the on-screen joystick to operate your camera, however, I find it quite difficult to have slow and steady movements and there are no settings to adjust. So to cheat it a bit I usually select a non-moving object for tracking and then use onscreen controls and in that case, the movement of the camera will be a bit limited on degrees, but it will move much slower and smoother.
I really like the motionlapse feature. And if you use ND filters you can have a long exposure motion and timelapses which looks great.
Since I like my shots to have slow and steady motion I usually use either lock or track motion mode. I find fav a bit hectic to control. But if you are like visually more fast motion shots, then fpv is one to consider.
I like the hyperlapse feature but I prefer to have more control with my shots hence I shoot normally and then retime video in post-processing. Start at 1000% and adjust to your liking. In this case, you can have full control over the retiming of your hyperlapses.
Video settings

Let’s talk about the right settings.
I shoot all my base footage at 24fps (23.976 to be correct)
I use both jpegs and video for timepalses and motionlapses, in my opinion, you can get more out jpegs sequences in post-processing using Lightroom and LRTimelapse then if you use only the video.
I use ND filters to reduce the light coming to the lens to achieve 180° rules for great motion blur (double your fps by 2 to get a correct exposure, for example, 24x2=48 so closest shutter speed is 50 so use 1/50 for great motion blur)
Stay at lower ISO possible to avoid noise. I usually shoot with ISO 100, but at the darker time I had to switch to higher ISO 400–800 for that I have to compensate with reducing noise in post-processing. In my opinion, anything above 800 is way too noisy so try to stay out of it.
I use manual exposure in many cases so I have a better control over the picture. ( sometimes I underexpose shots so I can still have good highlights and be able to recover shadows)
4k is my setting to shoot video, however, I not creating final videos in 4k. I output in 3k so in that case, I have more control over composition. I can even zoom in/out a bit or pan shots.
My personal preferences are to create images in 2.39:1 aspect ration. This aspect ratio is for anamorphic and looks really great to the eye.
Post-production

I use Davinci Resolve 16 for all my video editing, grading, sfx, sky replacements and so on, except titles (I find it easier to create in Adobe After Effects)
For me, post-production is a vital part of film creation. I carefully choose my main soundtrack so it is not just “because I find free stuff on some stock music site” but since I strive to create memorable films, it’s rather very important that it reflects mood and feel of the film to its highest. Sometimes it takes me 1–2 weeks to find the right candidate for my score.
SFX is also an important part of any production. It will bring more atmosphere to the film and made it look more polished and professional.
Color correction and grading is that part where you can set a strong tone for your production. Choose carefully the grading for your film. It should reflect the idea of the video as well as mood.
Bad or inappropriate grading can ruin the feel of the whole film.
Editing is another very important part. Choose only the best cuts, carefully edit your shots. It is better to leave your film for 1–2 days, after all, is done and to come back with “a pair of fresh eyes” or better yet make a small screening for close friends or colleagues and see their reactions, listen to their feedback and see if the film needs adjustments.

It will be a bonus if you could create a strong, memorable poster for your film.
It will grab the attention to it right away. Don’t make cliche YT type covers, instead aim for more of a movie like a poster type.
Create both horizontal and vertical versions for different social platform type.
You could create a poster from your video as a screenshot but better yet is to shoot a raw photo with OP on location if you feel like the scene could become your poster frame. In that case, you have a bit more room to adjust it in post.
I hope this post will be helpful to you.
Good luck with your creations.


